A1 Garage Door Logo 1

garage door opener

How to program liftmaster garage door opener
How to program liftmaster garage door opener?

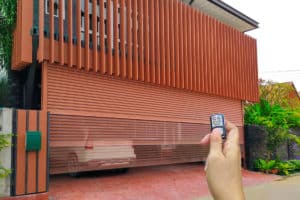
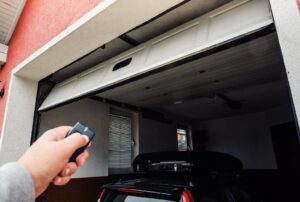
Have you recently placed your garage door? But after some time, you saw that its remote is not working. According to my opinion, there may be a simple solution might program it with your garage door. This also works if you have a brand-new opener or want to link the opener to your HomeLink gadget. How you cross about it absolutely depends on the emblem of the opener and the controller. Here, we’ll show you the way to software a Liftmaster storage door opener and link it to your far-flung in a few smooth steps. So here in this article, I will tell you How to program liftmaster garage door opener? Steps to How to program liftmaster garage door opener?   Open the panel on the garage door opener The garage door opener unit is a box mounted toward the roof of your garage. You will need a steady ladder to access the unit. Locate the placement of the panel on the unit. Some Liftmaster garage door openers have a side panel while others come with one at the back of the unit. Pull the panel open to access the inside of the motor unit. The panel is attached to the unit by hinges and will swing down when opened. Locate the learn button on the motor unit In step two locate the learn button on the garage door opener. It is a very crucial thing in the programming of garage doors. On the control panel, locate a tiny circular or rectangular button labeled ‘LEARN’. The button may be yellow, orange-purple, red, or green relying on your storage opener model. The coloration of the unit’s antenna wire fits the shade of the button so if the wire is yellow, the button can be yellow. Take be aware of the small LED adjacent to the button. The LED lights up the equal coloration as the button. Turning On the program button on the remote control On each style of Liftmaster, there is always a program button. But this may be located in a different place. On the manipulate panel, find a tiny round or square button categorized ‘LEARN’. The button can be yellow, orange-purple, purple, or green relying on your garage opener model. The coloration of the unit’s antenna cord suits the color of the button so if the cord is yellow, the button can be yellow. Take be aware of the small LED adjoining the button. The LED lights up the same color as the button. Test the Remote Control Turn on your automobile ignition. Be sure to have the handbrake on. If programming the HomeLink gadget for the primary time, erase all preinstalled codes. To try this, press the 2 outer buttons of the HomeLink for approximately 20 seconds or till the LED begins to flash. Point your hand-held remote control in the front of the HomeLink transmitter. Simultaneously, keep the HomeLink button you wish to program and the Open button on your far-off manipulate.

how to reset liftmaster garage door opener
How to Reset a Liftmaster Garage Door Opener in 5 Easy Steps

If you are having trouble with your Liftmaster garage door opener, don’t worry – you can reset it in just 5 easy steps! We will walk you through how to do it below. Keep in mind that before you reset the garage door opener, you should check to make sure that the problem is not caused by a faulty sensor or something else like that. If it is a sensor issue, then resetting the opener will not solve the problem. But if you have tried all of the other troubleshooting tips and you are still having problems, then follow these instructions to reset the garage door opener: 1. Start by unplugging the garage door opener from the power outlet. 2. Next, disconnect the garage door opener from the wall control unit. 3. Once that is done, remove the batteries from the remote control. 4. Now it is time to clear the memory of the garage door opener. To do this, press and hold the “learn” button on the garage door opener for at least 6 seconds. 5. Finally, plug the garage door opener back into the power outlet and reconnect it to the wall control unit. Another option is to reset garage door opener by disconnecting it from the power outlet for about 30 seconds. Then plug it back in and see if that solves the problem. If you are still having trouble with your garage door opener, you can always contact Liftmaster customer service for assistance. Will unplugging a garage door opener reset it? The answer to this question is yes – unplugging the garage door opener will reset it. However, you may want to try the other method of resetting the opener that we described above first. If that doesn’t work, then unplugging and replugging the garage door opener should do the trick. How do I clear the memory of my garage door opener? Clearing the memory of your garage door opener is a necessary step in resetting it. To do this, press and hold the “learn” button on the garage door opener for at least 6 seconds. This will clear the memory of the opener and allow you to start fresh. What should I do if my garage door opener isn’t working? If your garage door opener isn’t working, the first thing you should do is check to make sure that the problem is not caused by a faulty sensor or something else like that. If it is a sensor issue, then resetting the opener will not solve the problem. But if you have tried all of the other troubleshooting tips and you are still having problems, then you can try resetting the garage door opener. To do this, start by unplugging the garage door opener from the power outlet and disconnecting it from the wall control unit. Next, remove the batteries from the remote control. Now it is time to clear the memory of the garage door opener. To do this, press and hold the “learn” button on the garage door opener for at least 6 seconds. Finally, plug the garage door opener back into the power outlet and reconnect it to the wall control unit.

how to program liftmaster garage door opener remote
5 Easy Steps to Program Your LiftMaster Garage Door Opener Remote

If you have a LiftMaster garage door opener, and you’ve lost your remote or it’s just not working properly, don’t worry – you can easily reprogram it! In this blog post, we will walk you through the five easy steps to how to program liftmaster garage door opener remote. So follow along and we’ll have you up and running in no time! The first step is to locate the “learn” button on your garage door opener. This is usually located near the bottom of the unit, and it may be a different color than the rest of the buttons. Once you’ve found it, press and hold the “learn” button until the indicator light on the garage door opener unit flashes. Once you’ve located and pressed the “learn” button on your garage door opener, take your remote and press and release the “remote” button. You should see the indicator light on the garage door opener unit flash again. The next step is to enter your 4-digit PIN code on your remote. Once you’ve done this, press and release the “remote” button again. The indicator light on the garage door opener unit should now be solid, indicating that the remote is programmed. Now it’s time to test your newly programmed remote! Press the “remote” button and the garage door should open. If it doesn’t, go back to Step Three and make sure you entered the PIN code correctly. If you have additional LiftMaster remotes that you need to program, simply repeat Steps Two through Four for each one. That’s all there how to program liftmaster garage door opener remote! In just a few minutes, you can have all of your LiftMaster garage door opener remotes programmed and working properly. How do I reset the pin on my LiftMaster keypad? If you need to reset the pin on your LiftMaster keypad, simply press and hold the “Learn” button for approximately six seconds. This will clear any existing pins and allow you to enter a new one. What is the yellow learn button? The yellow learn button is used to program your garage door opener. It is usually located near the top of the garage door opener. Press and hold the yellow learn button for six seconds to put your garage door opener into pairing mode. Where is the Learn button on my Liftmaster? The learn button on your Liftmaster is usually located near the top of the keypad. It may also be labeled as the “smart” or “program” button. What do I do if my Liftmaster remote stops working? If your Liftmaster remote stops working, you will need to reprogram it. To do this, press and hold the “Learn” button on your keypad for approximately six seconds. Then, press and hold the “Smart/Program” button on your remote for six seconds. This will pair your Liftmaster keypad and remote. You can also consult a professional for more tips. How do you program LiftMaster wall controls? To program LiftMaster wall controls, press and hold the “Learn” button for approximately six seconds. This will put your wall control into pairing mode. Then, press and hold the “Smart/Program” button on your remote for six seconds. This will pair your remote with your wall control. You can now use your remote to operate your garage door. What are the 3 buttons on a LiftMaster garage door opener? The three buttons on a LiftMaster garage door opener are the “Learn” button, the “Smart/Program” button, and the “Pin” button. The “Learn” button is used to program your remote. The “Smart/Program” button is used to pair your remote with your keypad. The “Pin” button is used to reset the pin on your keypad.